![]()
![]()
![]() 'Incident Commander
Pro - Version 8'
'Incident Commander
Pro - Version 8' 
- Knowledge Base -
![]() Tip:
Tip:
![]() Rapid
Responder Deployments with 'Incident Commander Pro'
Rapid
Responder Deployments with 'Incident Commander Pro'
![]()
Managing
the incident requires a fast and effective field response.
Responders expect to be
quickly signed-in, promptly briefed and then rapidly deployed. They can become
impatient - and then vocal - if they perceive administrative delays that appear
to be slowing down their field deployment.
‘Incident Commander Pro’
is widely acknowledged to be a very fast and efficient tool for managing and
deploying responders, with many features specifically designed for this purpose.
In fact over 1,200 convergent volunteers a day have been signed-in,
briefed and rapidly deployed using ‘Incident Commander Pro’.
To make full use of the speed
and efficiency of ‘Incident Commander Pro’ there are number of techniques
that can be used to speed up the ‘traffic flow’ of managing large numbers of
personnel and quickly deploying them to their assignments. The following
procedures have been field-proven over time and found to be very effective at
delivering a fast and efficient deployment of field responders.
![]() Pre-Planning
Pre-Planning
It is strongly recommended, whenever possible, to pre-load ‘Incident Commander
Pro’ with as much information as is available. Probably the most important
single item to enter is the Personnel data, prior to its being used later for
personnel check-in. Personnel data can be entered manually but the powerful
Import routine will very rapidly import an entire Excel spreadsheet in a matter
of seconds. A pre-formatted Excel spreadsheet Import Excel
Personnel File
is available into which your
own personnel data can then be appended, ready for immediate importing.
Once the personnel data has
been entered or imported arriving personnel can then be rapidly checked-in using
the Check-In form, with the personnel data previously entered now being
displayed in the check-In form’s selection list.
 An even faster way to
Check-In personnel is to use the integrated Barcode
System. Barcoded personnel
ID cards, or a printed barcode list of personnel, can be instantly scanned into
the Check-In form, with virtually no errors. This is the fastest and most
accurate procedure for very rapidly checking-in personnel.
An even faster way to
Check-In personnel is to use the integrated Barcode
System. Barcoded personnel
ID cards, or a printed barcode list of personnel, can be instantly scanned into
the Check-In form, with virtually no errors. This is the fastest and most
accurate procedure for very rapidly checking-in personnel.
 Paperwork
Flow
Paperwork
Flow
Carefully managing the paperwork flow during the busy Check-In and task
assignment stage of an incident can significantly improve the speed at which the
responders are deployed. The following procedure has been found to create an
efficient deployment with the minimum amount of delay.
 Check-In
Procedure
Check-In
Procedure
Print a list of paper sign-in sheets with the personnel names already listed.
Blank sign-in sheets can also be printed for spontaneous volunteers or other
personnel not already pre-loaded into ‘Incident Commander Pro’.
As personnel arrive they sign
the paper sign-in sheets and then begin preparing for their field assignments.
As the sign-in lists become filled photocopies of the lists are taken to the
computer where the Check-In form is displayed. As each signed name is selected
from software’s Check-In form’s personnel list, that person is both
checked-in on the software and a small checkmark placed beside their name on the
sign-in photocopy. This makes it clear that each person has been fully
checked-in – while the original paper sign-in form is still being used by
other arriving personnel. This procedure ensures that arriving personnel are not
delayed in any way, without queuing or waiting to be checked-in.
 Task Assignments
Whenever possible task assignments should be created and printed before the
responders arrive. This may require a night-shift to enter the assignments, or a
very early start by the planning team, with the goal of creating a printed list
of task assignments prior to the arrival of the responders. These
computer-generated task assignment forms generally include the task assignment
information, but do not typically include specific personnel names, radio
callsigns or cellphone numbers. It is good practice to print out all these
task-only assignment forms prior to the responders arriving.
When the responders arrive
each team leader is briefed on his/her printed task assignment. The team leader
then takes the paper copy of the assignment form, briefs the other team members
and then writes the names, radio call-signs and cell-phone numbers of all the
field-team members onto the paper assignment form. A photocopy of this
hand-completed assignment form is then returned to the computer where this
additional field-team member’s names and contact information are later
entered, usually in the quieter period after the deployments have occurred. In
this way the responders are not delayed, as they do not have to wait for the
assignment’s software data-entry to be fully completed.
![]() Communications Log
Communications Log
Historically communications logs have been handwritten, typically alternately
between answering the microphone and then writing the dialogue onto the paper
communications log. This can be slow and sometimes difficult to read, with the
additional risk of making mistakes in manually writing the correct call-signs
and their true time-stamps.
The ‘Incident Commander
Pro’ communications log speeds up log entry and improves accuracy by
automatically inserting the call-signs (from the assignment forms) and the
dialogue time stamps. This rapidly generates legible, sortable logs that can be
printed in a number of formats. Entering the dialogue field does require typing
on the keyboard, which is typically done after the dialogue has been received.
An even faster approach entails installing a push-to-talk footswitch for the
microphone. This frees up both hands to type in the dialogue entry immediately
it is received.
![]()
These field-proven tips will deliver faster responder deployments, while
simultaneously improving personnel check-in, briefing, deployments and
mission communications.
![]() Tip:
Displaying
Google Earth Maps in 'Incident Commander Pro'
Tip:
Displaying
Google Earth Maps in 'Incident Commander Pro'
|
|
|
|
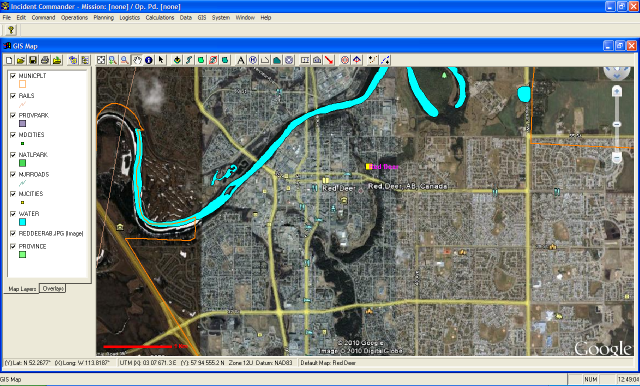
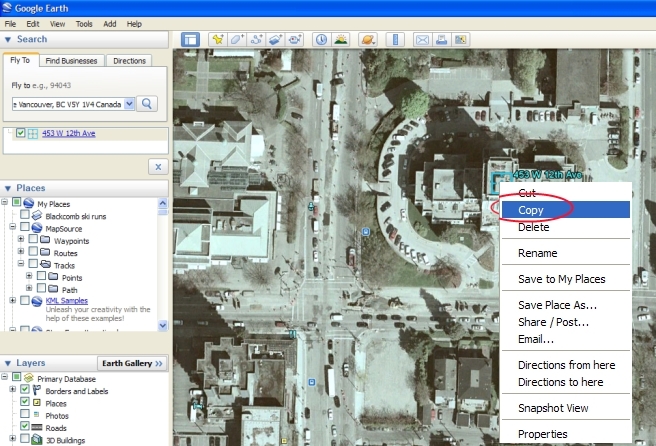
![]() Google Earth map images can
be saved (Save... Save Image...) and displayed directly within the map module of
'Incident Commander Pro', using the 'Add Layer' button.
Google Earth map images can
be saved (Save... Save Image...) and displayed directly within the map module of
'Incident Commander Pro', using the 'Add Layer' button.
![]() However the saved Google
Earth jpg image needs a companion 6-line text 'world file' to correctly
geo-reference (locate and scale) the image within the map module:
However the saved Google
Earth jpg image needs a companion 6-line text 'world file' to correctly
geo-reference (locate and scale) the image within the map module:
|
|
|
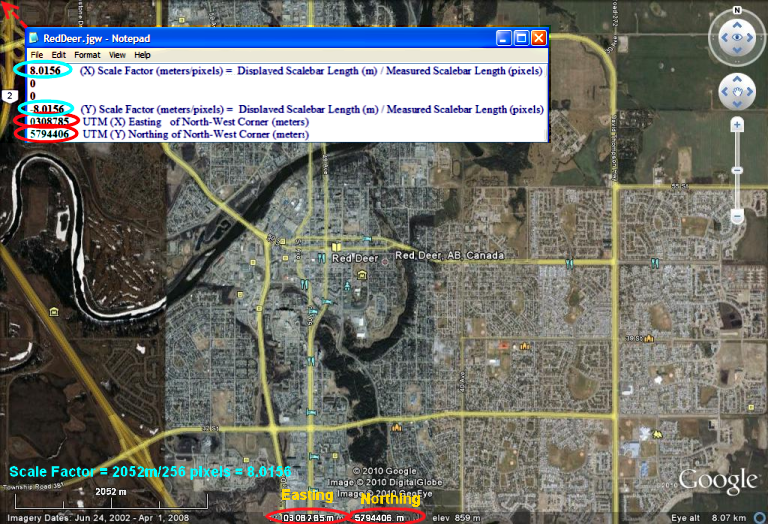
The Google Earth jpg map image and its companion geo-referencing text 'World File' |
![]() Geo-referencing 'World File' Creation
Geo-referencing 'World File' Creation
- First configure Google
Earth to display in UTM units, with
the scale-bar visible, then save the map image
(e.g. to RedDeer.jpg) .
- Move the cursor to the
top-left (North-West) corner of the map and record the UTM Easting &
Northing values, from the location display (e.g. 0308785E,
5794406N).
- Record the displayed
Scale-Bar Length e.g. 2052m.
- Load the jpg map-image into
an image editor and measure the pixel length of the scalebar
e.g. 256 pixels
- Calculate the map image Scale Factor = Displayed Scalebar Length (m) / Measured Scalebar Length (pixels) e.g. 2052m/256 pixels = 8.0156 m/pixel.
![]() Enter the map-image UTM Easting, UTM Northing and Scale Factor values into the
six-line text 'world file' (eg RedDeer.jgw) as shown below:
Enter the map-image UTM Easting, UTM Northing and Scale Factor values into the
six-line text 'world file' (eg RedDeer.jgw) as shown below:
8.0156
(X) Scale Factor (meters/pixels) = Displayed Scalebar Length (m) /
Measured Scalebar Length (pixels)
0
0
-8.0156 (Y)
Scale Factor (meters/pixels) = Displayed Scalebar Length (m) / Measured
Scalebar Length (pixels)
0308785
UTM (X) Easting of the North-West Map Corner (meters)
5794406 UTM
(Y) Northing of the North-West Map Corner (meters)
With the RedDeer.jgw text 'world-file' saved in the same folder as the
RedDeer.jpg image file, 'Incident Commander Pro' will display the map image to
the correct scale and location within the map module.
![]() Tip:
Using
Google Earth with 'Incident Commander Pro'
Tip:
Using
Google Earth with 'Incident Commander Pro'
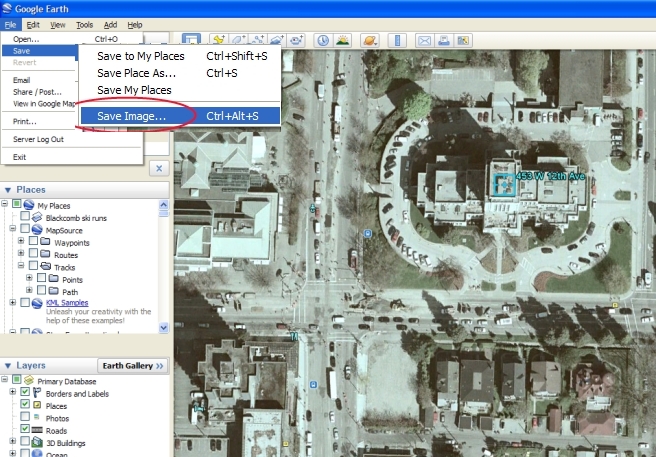
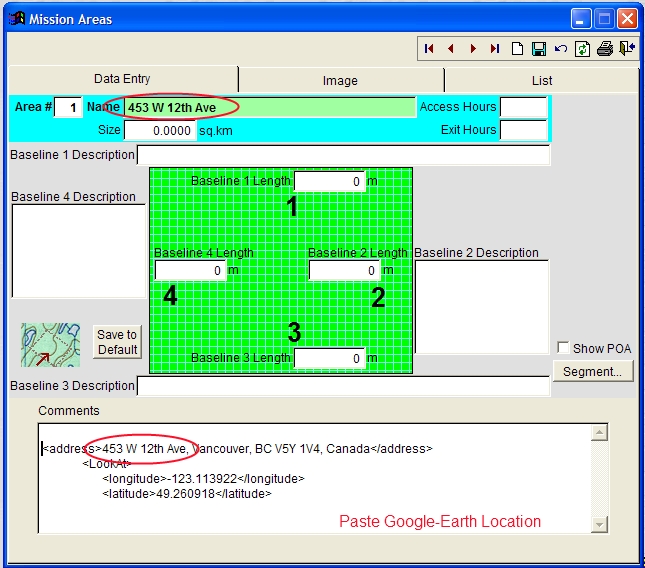
![]() Google Earth information may easily be entered into 'Incident Commander Pro' for
quickly creating area information and mission assignments.
Google Earth information may easily be entered into 'Incident Commander Pro' for
quickly creating area information and mission assignments.
|
|
 |
|
|
 |
|
|
 |
|
|
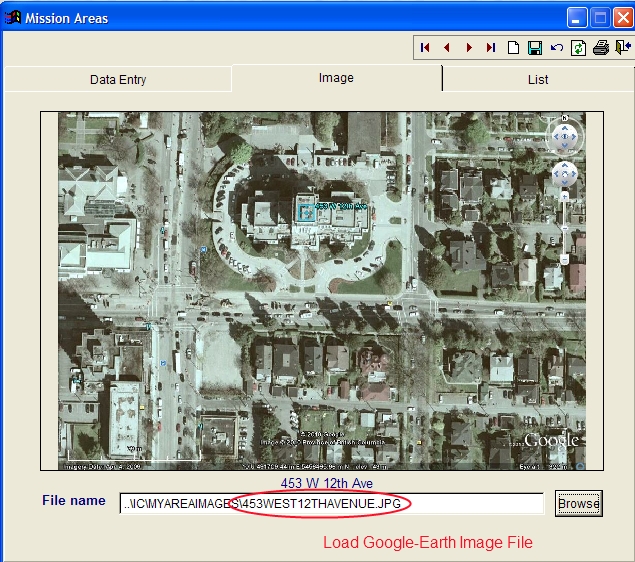 |
The Google Earth address, location and
map image are now ready for use in 'Incident Commander Pro'.
![]() Tip:
Displaying 'Incident Commander Pro'
Maps in other GIS Applications
Tip:
Displaying 'Incident Commander Pro'
Maps in other GIS Applications
![]()
 Displaying
'Incident
Commander Pro' maps in GIS applications can be useful when other organizations wish to review the
shapefile GIS
maps created by 'Incident
Commander Pro'.
Displaying
'Incident
Commander Pro' maps in GIS applications can be useful when other organizations wish to review the
shapefile GIS
maps created by 'Incident
Commander Pro'.
The
customized
'Incident
Commander Pro' ![]() Areas
Areas ![]() Polygons,
Polygons, ![]() Routes,
Routes,
![]() Lines and
Lines and ![]()
![]() Labels, which are drawn on top of the base
map layers, can be directly displayed by other GIS applications.
Labels, which are drawn on top of the base
map layers, can be directly displayed by other GIS applications.
Adding projection files, from the table below, permits these customized features to be displayed, with
their full geo-locating and scaling, in other GIS applications.
Instructions:
e.g. for an 'Incident Commander Pro'
mission map called 'Mission1'
Right-click the ![]()
![]() Route projection file for your region and Save Target As...
Route projection file for your region and Save Target As... ![]() C:\Program Files\SAR Technology\IC\Gis\Data\Mission\Mission1_ln.prj
C:\Program Files\SAR Technology\IC\Gis\Data\Mission\Mission1_ln.prj
Right-click the ![]()
![]() Area projection file for your region and Save Target As....
Area projection file for your region and Save Target As.... ![]() C:\Program Files\SAR Technology\IC\Gis\Data\Mission\Mission1_ply.prj
C:\Program Files\SAR Technology\IC\Gis\Data\Mission\Mission1_ply.prj
Right-click the
![]()
![]() Label
projection file for your region and Save Target As....
Label
projection file for your region and Save Target As.... ![]() C:\Program Files\SAR Technology\IC\Gis\Data\Mission\Mission1_pnt.prj
C:\Program Files\SAR Technology\IC\Gis\Data\Mission\Mission1_pnt.prj
or
e.g. for an 'Incident Commander Pro' default map called 'YosemitePark'
Right-click the ![]()
![]() Route projection file for your region and Save Target As...
Route projection file for your region and Save Target As... ![]() C:\Program Files\SAR Technology\IC\Gis\Data\Default\YosemitePark_ln.prj
C:\Program Files\SAR Technology\IC\Gis\Data\Default\YosemitePark_ln.prj
Right-click the ![]()
![]() Area projection file for your region and Save Target As....
Area projection file for your region and Save Target As.... ![]() C:\Program Files\SAR Technology\IC\Gis\Data\Default\YosemitePark_ply.prj
C:\Program Files\SAR Technology\IC\Gis\Data\Default\YosemitePark_ply.prj
Right-click the
![]()
![]() Label
projection file for your region and Save Target As....
Label
projection file for your region and Save Target As.... ![]() C:\Program Files\SAR Technology\IC\Gis\Data\Default\YosemitePark_pnt.prj
C:\Program Files\SAR Technology\IC\Gis\Data\Default\YosemitePark_pnt.prj
Common GIS applications will then be able to directly browse to and display these geo-located and scaled customized 'Incident Commander Pro' maps.
Alternatively the customized map
feature
files (.shp .shx .dbf
.prj) may be copied to another computer for
a GIS application to display:
e.g. Copy to
[New Computer] ![]()
![]() C:\Program Files\SAR Technology\IC\Gis\Data\Mission\Mission1_ln.shp Mission1_ply.shp
Mission1_pnt.shp Mission1_ln.prj Mission1_ply.prj
Mission1_pnt.prj Mission1.shx Mission1.dbf
C:\Program Files\SAR Technology\IC\Gis\Data\Mission\Mission1_ln.shp Mission1_ply.shp
Mission1_pnt.shp Mission1_ln.prj Mission1_ply.prj
Mission1_pnt.prj Mission1.shx Mission1.dbf
![]() Tip:
Copying 'Incident Commander Pro'
GIS Maps to another Computer
Tip:
Copying 'Incident Commander Pro'
GIS Maps to another Computer
![]()
Copying
'Incident
Commander Pro' GIS
maps to another computer can be useful for both
backing up the maps and for displaying these maps on other computers. Sharing
the GIS maps can be especially useful when other teams and organizations running 'Incident
Commander Pro' are assisting with an incident.
![]() Incident Commander Pro's
GIS
maps contain
Incident Commander Pro's
GIS
maps contain ![]() background map layers and
background map layers and ![]()
![]()
![]()
![]()
![]()
![]() customized map features.
customized map features.
These layers and features can be copied to another computer as follows:
Example: Assuming the 'Incident Commander Pro' background map layers of states, rivers,
roads and cities were added from ![]() C:\Mapfiles\US\ ...
C:\Mapfiles\US\ ...
1. Copy the entire background layers folder
[Original Computer] ![]() C:\Mapfiles\US\ to [New
Computer]
C:\Mapfiles\US\ to [New
Computer] ![]() C:\Mapfiles\US\
C:\Mapfiles\US\
2. For an 'Incident Commander Pro' default map called 'YosemitePark'
Copy the customized map features file-set (.map
.shp .shx .dbf) to the same
folder on the new computer...
Copy
[Original Computer] ![]() C:\Program Files\SAR Technology\IC\Gis\Data\Default\YosemitePark.map
YosemitePark.shp YosemitePark.shx YosemitePark.dbf
C:\Program Files\SAR Technology\IC\Gis\Data\Default\YosemitePark.map
YosemitePark.shp YosemitePark.shx YosemitePark.dbf
to
[New Computer] ![]() C:\Program Files\SAR Technology\IC\Gis\Data\Default\YosemitePark.map
YosemitePark.shp YosemitePark.shx YosemitePark.dbf
C:\Program Files\SAR Technology\IC\Gis\Data\Default\YosemitePark.map
YosemitePark.shp YosemitePark.shx YosemitePark.dbf
When Incident Commander Pro's
GIS
map module is then opened on the new computer the copied 'YosemitePark'
default map will be listed for display.
![]() Tip:
Upload/Download 'Incident Commander
Pro' GPS Routes
, Tracks & Waypoints
Tip:
Upload/Download 'Incident Commander
Pro' GPS Routes
, Tracks & Waypoints

![]() GPS Waypoints:
GPS Waypoints:
Waypoint locations stored on the GPS can be downloaded and
displayed as individual point locations on the GIS
map, as either a 'dxf' or 'shape'-file. Garmin's Mapsource
software will download and save these locations as a 'dxf' file, which can then
be displayed as a ![]() 'dxf'-points layer on the GIS
map.
'dxf'-points layer on the GIS
map.
Use the shape-file Comment, or the dxf-points file Description, map-layer
property to display labels beside these map icons. This can be very useful for customizing local maps with specific local
features such as landmarks, landing zones, repeater sites etc.
![]() Tip: Creating 'Incident Commander' Reports as Microsoft
portable XPS files
Tip: Creating 'Incident Commander' Reports as Microsoft
portable XPS files
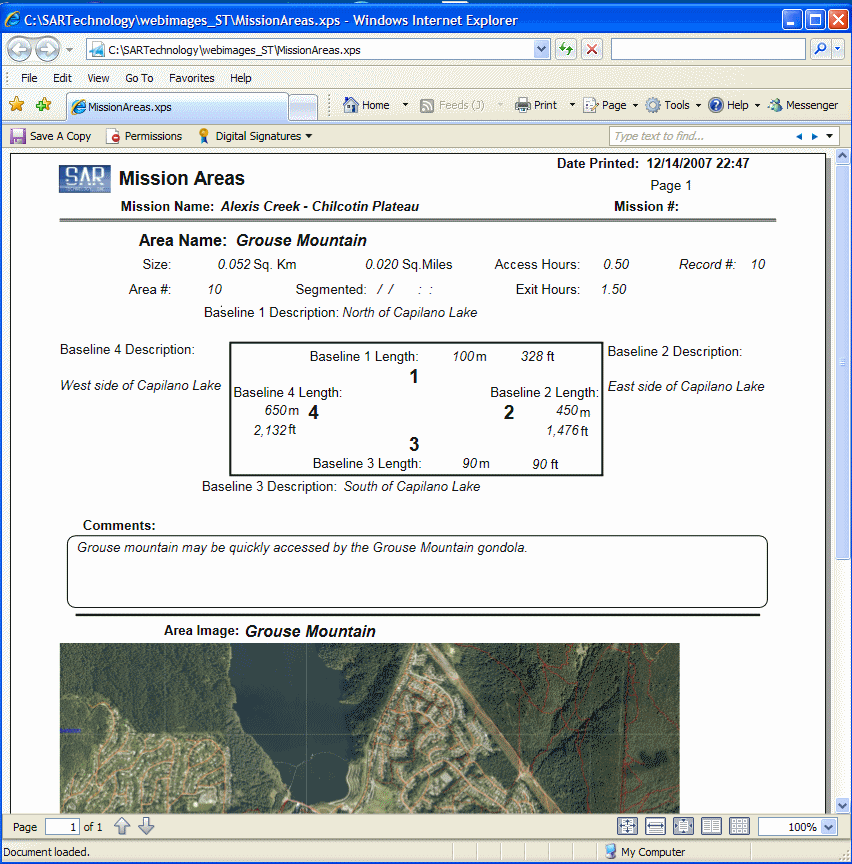
![]()
Creating 'Incident Commander’ reports as Microsoft XPS files.
Here is a convenient new way to view and share 'Incident Commander Pro' information.
By installing Microsoft's free XPS Document Viewer ‘Incident Commander’ reports can be printed directly to the XPS (XML Paper Specification) format. This creates output to a small, portable XPS file that is an exact, formatted copy of the original report.
These XPS files (.xps) may be printed immediately from the 'Incident Commander' Print menu, viewed directly in Internet Explorer, saved as permanent data backup, emailed to the responsible agency and shared with other applications.
![]() Tip:
Print 'Incident
Commander Pro' maps
in large format
Tip:
Print 'Incident
Commander Pro' maps
in large format
'Incident Commander Pro's
GIS
![]() 'Export Map Image' function permits the
displayed map to be saved as a jpg image file. This image can be printed
directly at the normal printer paper size.
'Export Map Image' function permits the
displayed map to be saved as a jpg image file. This image can be printed
directly at the normal printer paper size.
Many image editors, such as Ulead Photo Express, permit images to be printed in a large-scale tiled 'poster' format.
Before exporting the
map image increase the Scale Factor from 1 to 5, to increase the image
resolution, and then print the saved image using a tiled 'poster' print utility.
This permits multiple hard copy pages to be tiled together to create a large
scale 'poster' map.
![]() Tip:
Display 'CAD Files in Incident
Commander Pro'
Tip:
Display 'CAD Files in Incident
Commander Pro' 
'Incident Commander Pro'
can display many common file types as ![]() map layers within it's GIS
map module. These
file types including shape-files,
coverages, tif, gif, jpg, bmp and MrSID images . 'Incident Commander Pro'
also has the capability to display the vector-based .DXF and .DWG CAD drawing
files.
map layers within it's GIS
map module. These
file types including shape-files,
coverages, tif, gif, jpg, bmp and MrSID images . 'Incident Commander Pro'
also has the capability to display the vector-based .DXF and .DWG CAD drawing
files.
Being able to display DWG and DXF files provides the unique
opportunity to review geo-located buildings and site-plans - such as stadiums,
conference centers, airports, public utilities, dams, power stations and other critical
infrastructures - within the 'Incident Commander Pro' GIS
map module. These
CAD file types are displayed as true engineering drawings, with all of their
associated properties - for example color, line-size, labels etc. - available
for fully customizable display by 'Incident Commander Pro'. For more information
see Displaying
CAD Files in 'Incident Commander Pro' .
![]() Tip:
Display 'Incident Commander' Reports
on your PDA!
Tip:
Display 'Incident Commander' Reports
on your PDA!
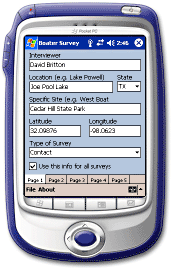 Printing
'Incident Commander' reports
to a PDF printer driver permits the fully formatted report files to be saved on the local computer or a
sent to a PDA. After transferring via the docking station, infrared port or cellular email connection,
these fully formatted PDF reports may be viewed on a PDA for rapid use by the incident response
team.
Printing
'Incident Commander' reports
to a PDF printer driver permits the fully formatted report files to be saved on the local computer or a
sent to a PDA. After transferring via the docking station, infrared port or cellular email connection,
these fully formatted PDF reports may be viewed on a PDA for rapid use by the incident response
team.
![]() Tip:
Store your Document and Image files
within the 'Incident Commander' Folder
Tip:
Store your Document and Image files
within the 'Incident Commander' Folder
 Running
'Incident Commander' over a network requires that your linked
files, such as Portrait images, Pre-Plan documents, Route images and Area
images, be available to all of the computers on the network. Storing these files
in sub-folders of 'Incident Commander' on the host computer will ensure
that all these user folders and files will be shared and accessible by all the
client networked computers.
Running
'Incident Commander' over a network requires that your linked
files, such as Portrait images, Pre-Plan documents, Route images and Area
images, be available to all of the computers on the network. Storing these files
in sub-folders of 'Incident Commander' on the host computer will ensure
that all these user folders and files will be shared and accessible by all the
client networked computers.
1. Create
the new folders: My_Documents, My_Reports, My_Portraits, My_RouteImages
and My_AreaImages under the shared host computer
C:\Program Files\SAR Technology\IC\ folder.
eg:
C:\Program Files\SAR Technology\IC\My_Documents
- for your Pre-Plan documents.
C:\Program Files\SAR Technology\IC\My_Reports
- for your
exported reports and fully-formatted PDF print reports.
C:\Program Files\SAR Technology\IC\My_Portraits
- for your Personnel and Missing Person images.
C:\Program Files\SAR Technology\IC\My_RouteImages
- for your Route Images.
C:\Program Files\SAR Technology\IC\My_AreaImages
- for your Area images.
2. Place your
document and image files in these folders.
This will make them easy to find over the network and ensures that they can be
shared and displayed by all of the networked computers running 'Incident
Commander'.
![]() Tip:
Creating 'Incident Commander' Reports
as PDF files
Tip:
Creating 'Incident Commander' Reports
as PDF files
Creating 'Incident Commander’
Reports as PDF files.
Here is a convenient new way to share
and archive 'Incident Commander' information. By
installing a PDF printer driver ‘Incident
Commander’ reports
can be printed directly to the PDF (Personal Document File) format.
This creates output to a PDF file that is an exact, formatted copy of the
original report. These PDF files (.pdf) may be printed immediately from the
'Incident Commander' Print
menu, saved as permanent data backup, emailed to the responsible agency and
shared with other applications.
![]() Tip: Prepare Pre-Planned Missions using 'Operational Period Zero'
Tip: Prepare Pre-Planned Missions using 'Operational Period Zero'
![]() 'Many users have asked if they can create permanently-stored pre-planned missions. The
answer is Yes! - and the process is very simple...
'Many users have asked if they can create permanently-stored pre-planned missions. The
answer is Yes! - and the process is very simple...
Step 1. Create a new (pre-plan) mission and give it a name that indicates
it is a preplan e.g.: 'Terrorist-Response Pre-Plan'.
Step 2. Give the mission an Operational Period Number ''0'.
(The Operational Period Number '0' indicates that the mission is a pre-plan
and not yet active).
Step 3. Enter all of the information that describes the mission - for
example a Communications Plan and a list of expected Mission Trails and Mission Search
Areas. An Operations Plan, consisting of a list of pre-prepared Assignments, is then
created, followed by any additional support information, such as the standard ICS section
forms, to complete the pre-plan.
Step 4. The stored pre-plan is then saved and kept ready to be used,
whenever the plan has to be implemented.
![]() Activation of
the Preplan. The stored pre-plan can be immediately activated at any time by
opening the pre-planned mission, renaming it slightly if required, and changing the
Operational Period Number to '1' (the first active operational
period). All of the pre-planned information previously entered for the mission may
now be used to immediately respond to the incident.
Activation of
the Preplan. The stored pre-plan can be immediately activated at any time by
opening the pre-planned mission, renaming it slightly if required, and changing the
Operational Period Number to '1' (the first active operational
period). All of the pre-planned information previously entered for the mission may
now be used to immediately respond to the incident.
In this way an unlimited number of
pre-plans can be created and stored permanently for immediate response to any type of
pre-planned incident.
![]() Tip: Sharing '‘Incident
Commander' Data between Organizations
Tip: Sharing '‘Incident
Commander' Data between Organizations
Response teams often wish to share information, such as as their
'Incident Commander'
software's Personnel and Organizations lists, with their neighboring teams. Sharing
and combining their lists permits the rapid check-in of searchers from neighboring
teams
and provides an expanded Teams & Agencies resource list. Data can be shared between
organizations using the three simple steps outlined below:
Step 1: Export the 'Incident
Commander' data to a Spreadsheet:
![]() Data can be exported using 'Incident Commander's' Export utility,
found within the Print Reports function. For example; export the Personnel Names report to
an Excel spreadsheet e.g. as 'PersonnelNames.xls'. This spreadsheet file can be given or
emailed to the neighbouring teams.
Data can be exported using 'Incident Commander's' Export utility,
found within the Print Reports function. For example; export the Personnel Names report to
an Excel spreadsheet e.g. as 'PersonnelNames.xls'. This spreadsheet file can be given or
emailed to the neighbouring teams.
Step 2: Simplify the Spreadsheet Display:
Open the Excel spreadsheet, select and then hide all of the columns you do NOT
wish to import - for example all of the columns except those listing personnel names and
telephone numbers. Use Excel's Format... Column... Hide... menu items to hide these
unwanted columns. The simplified spreadsheet will now display only the personnel names and
telephone numbers to be imported.
Step 3: Paste Data into 'Incident
Commander'
Arrange your computer desktop with the 'Incident Commander's' Personnel window above the Excel
window.
![]() 1. Create a new
personnel record using the 'new' button.
1. Create a new
personnel record using the 'new' button.
![]() 2. Place the
cursor over the Name record in Excel and press Ctrl-C to copy
the name.
2. Place the
cursor over the Name record in Excel and press Ctrl-C to copy
the name.
![]() 3. Place the cursor
in the Name field in 'Incident Commander's Personnel window and press Ctrl-V to paste
the name into the field.
3. Place the cursor
in the Name field in 'Incident Commander's Personnel window and press Ctrl-V to paste
the name into the field.
![]() 4. Repeat this process
for each of the phone numbers (home number, work number) etc.. and then save
the record in 'Incident Commander'. Repeat this process for each personnel record.
4. Repeat this process
for each of the phone numbers (home number, work number) etc.. and then save
the record in 'Incident Commander'. Repeat this process for each personnel record.
This simple procedure will rapidly import the previously-exported data into 'Incident
Commander'.
![]() Tip:
Tip:
![]() Expanded 'Help' features for 'Incident
Commander' software
Expanded 'Help' features for 'Incident
Commander' software
Many 'Incident Commander' users have asked for additional
information on how to setup, network and backup their copies of
'Incident Commander'. To assist in these important functions the 'Incident Commander'
Help facility has been expanded to include more detailed information on
these topics. You may view and download the latest 'Incident Commander'
Help files from the SAR Technology Downloads webpage.
![]() Tip:
Program Backup of 'Incident Commander' software
Tip:
Program Backup of 'Incident Commander' software
It is a good idea to make regular, dated backup copies of the entire 'Incident Commander'
program.
Create backup copies of the entire 'Incident Commander' software
program by copying to a separate (safe) location on a remote, large-capacity storage
disk.
It is recommended that the Incident Commander
program be backed up (copied) to another 'remote' (client) computers, or onto a CD or
mass storage device, after each Operational Period, at the completion of the mission or after a major
data entry session.
The best backup option for the
'Incident Commander' program is to copy the entire program onto a large-capacity removable-media drive
such as a re-writable CD-ROM, portable
hard drive, mass storage device, etc. These offer fast backup and simple restore capabilities through
the Windows Explorer.
When backing up, first close Incident Commander and then COPY THE ENTIRE Incident Commander
FOLDER
STRUCTURE, INCLUDING ALL SUBFOLDERS, to the backup device. Do not attempt any selective or
partial backup, as files in different folders are related to each other.
Never attempt to copy Incident Commander will the program is running
on any computer as data corruption of open files may occur.
Backup Tip: After the entire 'Incident Commander'
directory folder has been copied to its backup location it is recommended that this backup
folder be renamed to include the backup date, e.g. to a folder named: '[Drive]:SearchManager_23July2005'.
This backup folder contains a full copy of the latest data in the 'Incident Commander'
program. It also ensures that this backup folder can be copied back onto the 'host'
computer and used to run any future incident.
![]() Tip: Backup of 'Incident Commander' data
Tip: Backup of 'Incident Commander' data
Data backup is carried out
using the Print... Export
data function within the 'Incident Commander' software program - typically to text files (.txt), database (.dbf) files or Excel files (.xls).
These files should be stored off the host computer onto a mass storage device,
portable hard drive, floppy disk or CD.
Data Backup: Printing Reports
All of the reports listed in 'Incident Commander' may be printed out through the Print Reports
function. It is strongly recommended that every report listed be regularly printed
out and stored in a binder that is kept in a safe location. This hard-copy form
will ensure that the data entered into 'Incident Commander' will always be recorded in a
relatively permanent (paper), non-electronic format. Printing reports directly from the
Print Report function will ensure that every record in each table's report will be
printed. (Printing from an open form will typically only print the single, current record,
or one page-length of records).
Data Backup: Exporting Reports
All of the reports listed in 'Incident Commander's' Print Reports function may also be
exported in a variety of formats, including text files (.txt), database (.dbf) files or
Excel files (.xls). It is strongly recommended that every report listed be
regularly exported to at least one of these electronic formats. The files created
during the Export process should then be copied and stored onto a floppy disk, CD, Zip
disk, or copied onto another computer, this will keep this file data safe from the risk of
a hardware or software crash on 'Incident Commander's 'host' computer. If there is ever a need
to restore the data then these files can be opened, their data 'copied' and then 'pasted'
back into the correct form's fields within 'Incident Commander'.
For more information please
contact:
![]() SAR
Technology Inc.
SAR
Technology Inc.
 Phone:
(604) 921-2488
Phone:
(604) 921-2488  Fax
(604) 921-2484
Fax
(604) 921-2484 ![]() sartechnology@telus.net
sartechnology@telus.net
|
|
SAR Technology Inc. |  |
View / Save / Share |